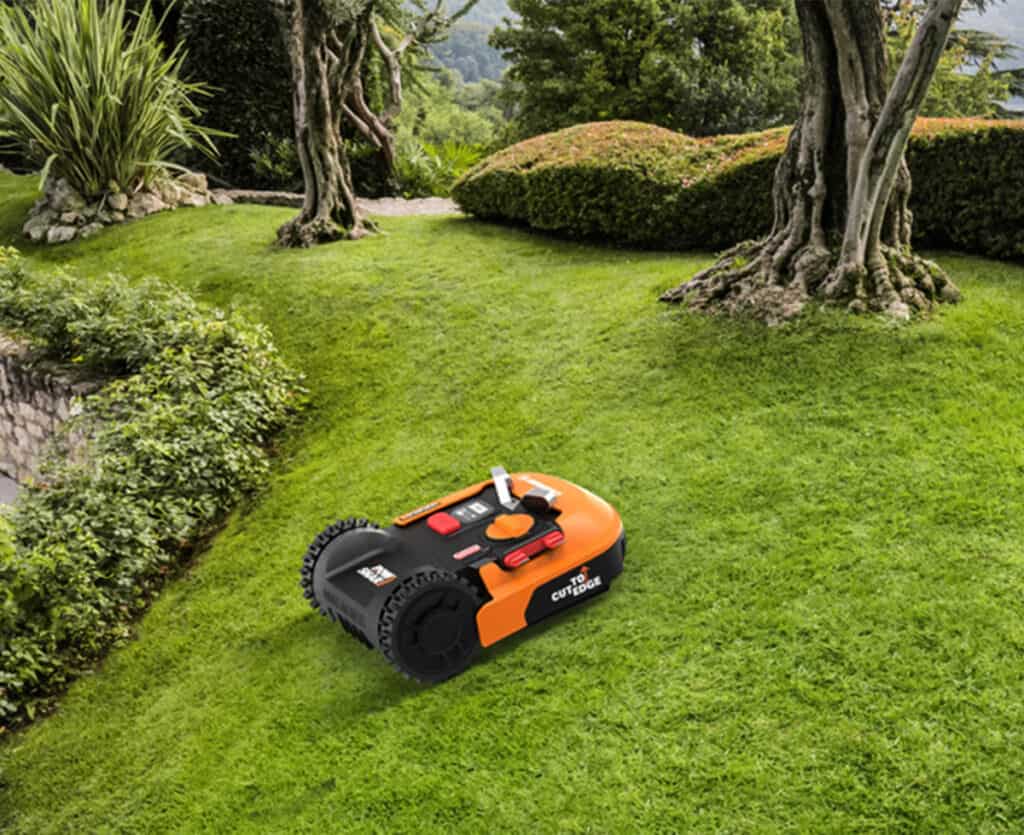
DIY robot mower Installation
DIY Installations do not need to be daunting or overwhelming
DIY robot mower installation is pretty easy nowadays as there are plenty of installation videos online from both the manufacturers and other DIYers. Just follow the user manual and you will be done in no time.
The biggest step is selecting the right Robot Mower for the job. If you need help please contact us and we can work out the best mower for you.
Below we will step through the process from conception to sitting back, cold drink in hand, watching your lawn being mowed fully autonomously.
Content
STEP BY STEP
1. Selecting a Robot Lawn Mower for your Lawn
The very first thing to do is to ensure robot lawnmowers are suitable for your lawn.
Most Australian lawns are split from the front yard to the back, left side and right side of the driveway as well. The robot mower can travel to these areas by itself with the appropriate installation or can be placed manually in different areas.
1.a) It is important to keep in mind that:
– Gates and narrow or loose stone paths will likely prevent the mower from having full access to all areas.
– The slopes are measured in gradients (%) and not degrees. Learn how to measure slopes and ensure that your selected mower is suitable for your lawn.
– The perimeter wire will need to surround all of your lawn areas, and to and from each area, and also around any island gardens or “no go” zone that you may have internal to your lawn area.
– It is highly recommended that your mower is capable of at least 130% of your measured area for simple open areas and 150% for more complex areas with multiple obstacles and/or narrow paths to navigate through.
1.b) Purchasing your Robot Lawn Mower
Now that you have all the details of your lawn requirements you can simply select a mower that suits your lawn size, slopes and sub-areas. So ensure you think of the following items when you are at the checkout:
- Your mower area capacity exceeds your total lawn area by 130-150%.
- Your mower is capable of navigating the maximum slopes you have on your lawn.
- Your mower is capable of enough sub-areas to cover the number of zones you need.
- The power cable from the charging station is long enough to reach your 240V power outlet.
- The mower comes with enough perimeter wire and pegs to complete your installation or if more wire needs to be purchased.
- You require a cover or garage for your mower (Highly recommended purchase if your charging station is not going to be installed in a fully shaded location.)

1.c) Know your Robot Lawn Mower
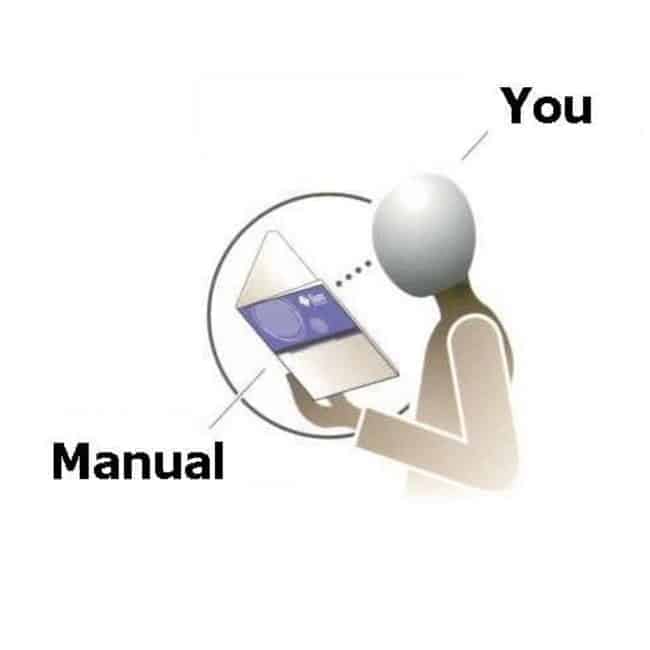
Once you know what robot mower you want to purchase, you can now read the installation manual to get a full understanding of your robot’s parameters.
Understanding these parameters before you plan your installation can be the difference between installing once or having to perform multiple changes to your installation.
Some robots have different requirements for how the charging station must be positioned. Not all robot mowers are the same thus, not all of them have the same requirements or configurations.
2. Plan your robot mower installation
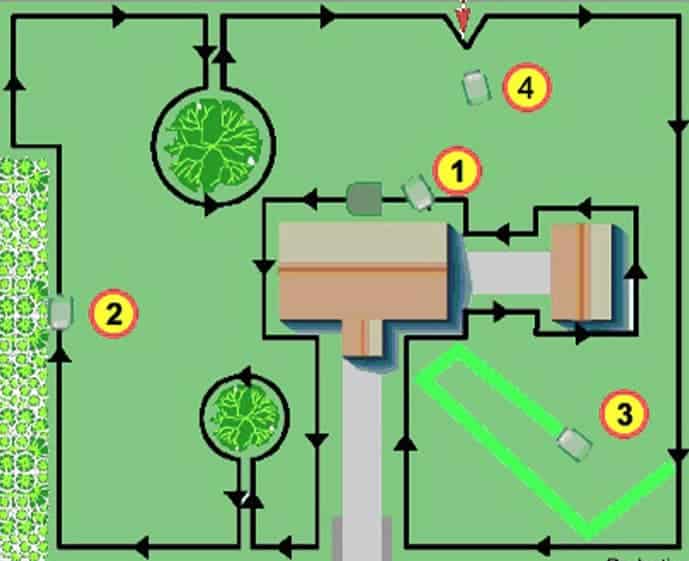
Time to put pen to paper and plan your installation. We recommend you either draw a simple sketch of your yard or print out a google maps image of your yard. You can then mark your planned charging station position.
Draw out your whole perimeter wire installation showing the distances your wire needs to be from each of the edges of your yard. Take particular notice of areas where your mower is turning around exterior corners to make sure the back of the mower does not hit anything as it turns.
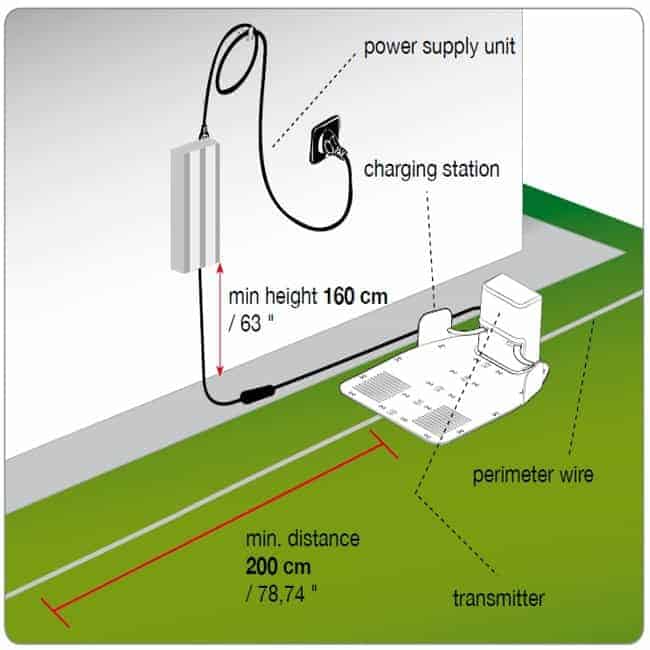
Make sure you can get power to your charging station and that you have selected a position that allows for enough straight wire in front of your charging station to allow the mower to dock correctly. This is typically about 2 meters.
2.a) DIY Installation of Charging Station
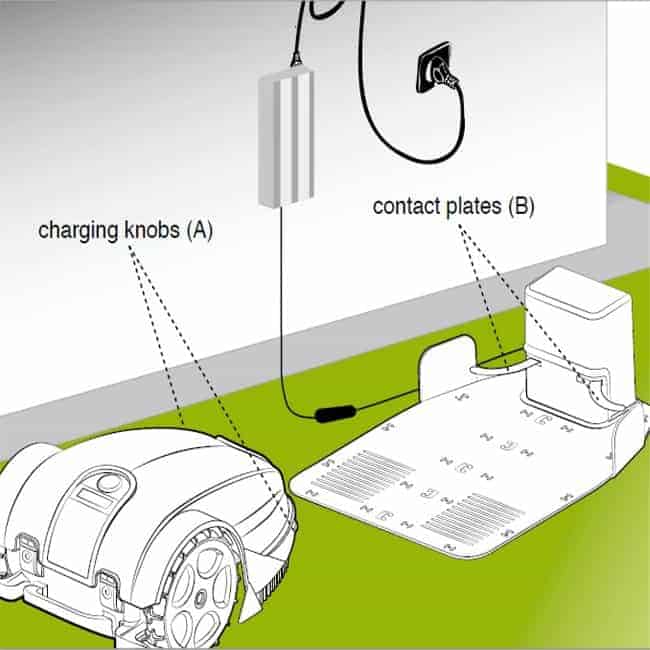
The charging station position and installation are one of the most critical elements of your installation. The chosen location is preferably in full shade, or if not a sun cover should be purchased.
As mentioned earlier, you will also need around 2 meters of straight perimeter wire in the lead-up to your charging station. This distance allows the mower to align itself and dock correctly every time.
We recommend that you remove the grass under the charging station and prepare the ground as level and flat as possible. A small amount of crusher dust under the charge station will also help the installation from sinking or moving over time.
Note that some charge stations (Worx Landroid for example) are designed to let the grass grow up underneath. For this type of station, we recommend you simply mower the grass down very low and install the station over the grass.
2.b) DIY Installation of Perimeter Wire
Distances from edges
The distance between the edge of your lawn and the perimeter wire changes according to the robot model. These distances will be clearly shown in your manual. When your robot mower travels, it will do it with the perimeter wire approximately centre to the mower.
Where your lawn has hard edges such as a fence or raised garden bed, you will need to install your wire about half the width of your mower plus a few centimetres for clearance. This will avoid the mower from hitting the fence mowing as close to the edge as possible.
Where your lawn has transitional edges that will allow your mower to travel half on and half of your lawn, (typically and concrete or paved area beside your lawn) you can lay your wire typically 10 centimetres or less from the edge. This will allow your mower to cut to the edge.
We recommend that once you have your installation planned you place pegs around your lawn to indicate the distances required on each lawn edge.
Corners should be installed in a radius rather than a square. We recommend an approximately 45cm radius.

2.c) DIY Installation of Perimeter Wire
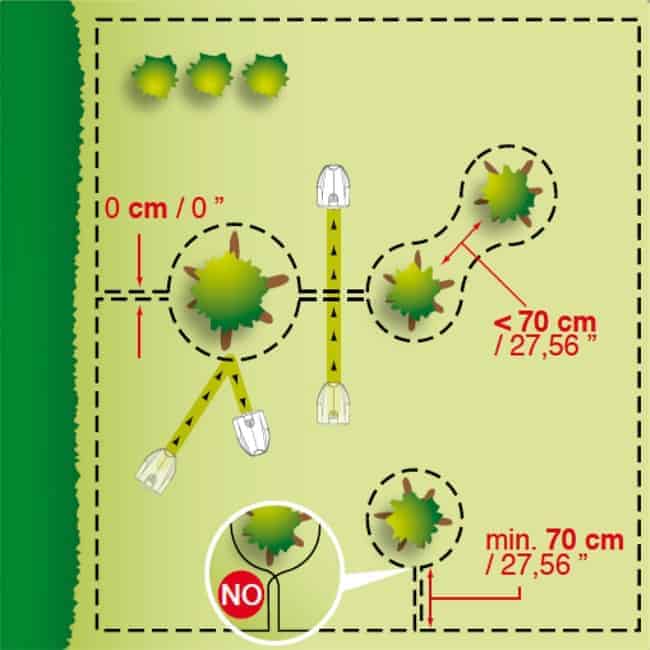
Islands and No Go Zones
In most installations, you will have an area within your lawn that you don’t want the robot mower to enter. This area might be an island garden or pool or similar. Stopping your mower from entering these areas is simple.
The theory of all robot mowers is that if you lay your perimeter wire out to the obstacle, around the obstacle and back along the same path back to your outer perimeter, the mower will ignore the two wires laying together but still obey the wire installed around your obstacle.
Typically, with most robot mowers when the wires are laid together at no more than 1 centimetre apart, the mower will not recognise this section.
2.d) DIY Installation of Perimeter Wire
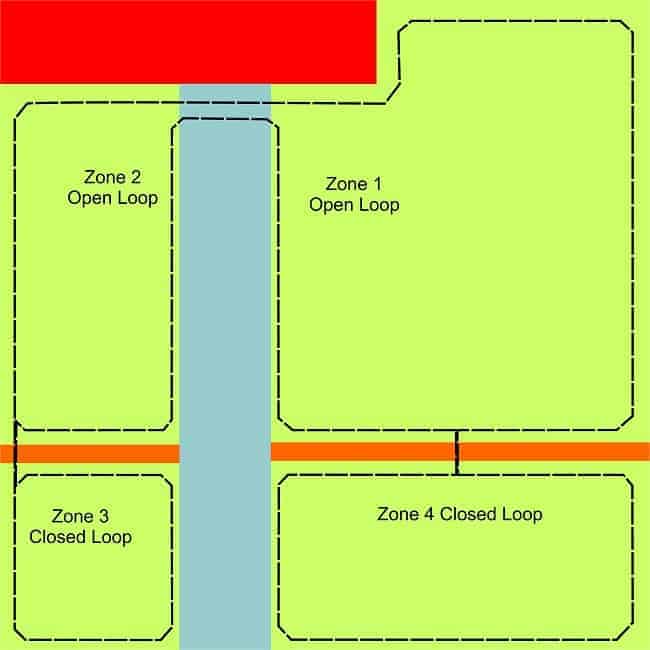
Closed and Open Loops
Most Australian properties will have more than one lawn to be serviced by your robot mower. This can most likely be achieved by most models, as long as you are physically able to get the perimeter wire around all lawns to be mowed in one continuous loop.
Where your property will allow access for the mower to travel between areas you may have the option to install your perimeter wire with an open section for the mower to exit the area to travel along the wire from one area to another.
We term this an “open loop”. This opening distance is different from model to model but typically around 50 centimetres.
Where your property does not allow access for the mower to travel, or you simply don’t want the mower to travel to this area on its own, you can then install what we term a “closed-loop”. This is where the perimeter wire is still installed from one area to another, but where the wires depart from one area there is no gap left to allow the mower to travel out. This is also the same where the wires enter the next area.
Further details of these methods to minimize the distances for open loops are available. Just contact us to find out the best solution for your installation.
2.d) DIY Installation of Perimeter Wire
Crossing driveways and paths
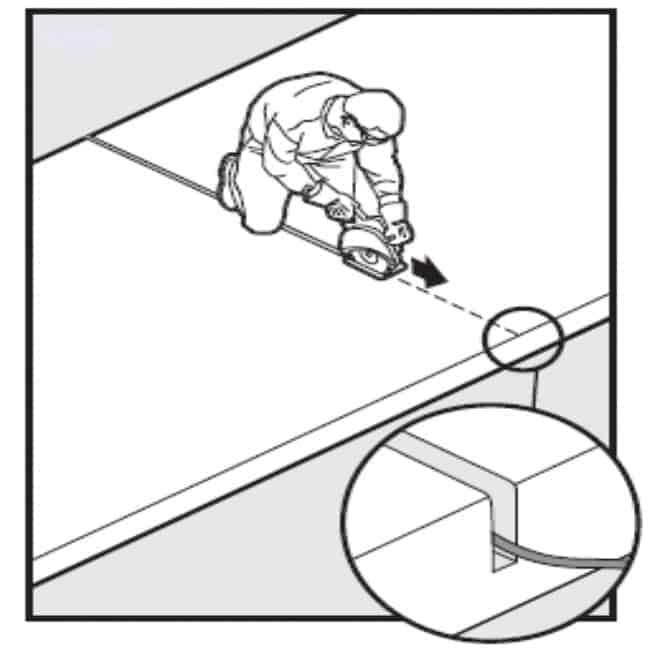
Crossing a driveway or part may be a necessary part of your installation. Allowing your perimeter wire to cross concrete can be achieved in three ways. The most efficient way is to use an existing expansion strip in your path. The wire can be simply pushed into the gap.
Secondly, we recommend you use a standard concrete grinder and cut a single line across the path about 1cm deep. The wire can then be laid in the cut and backfilled with paving sand.
Thirdly you can lay the wire on top of the concrete and place either a plastic or aluminium cover strip on this to protect the wire. This strip will need to be glued into position with a construction adhesive. (Note that some aluminium strips may affect the ability of some robots to follow the wire)
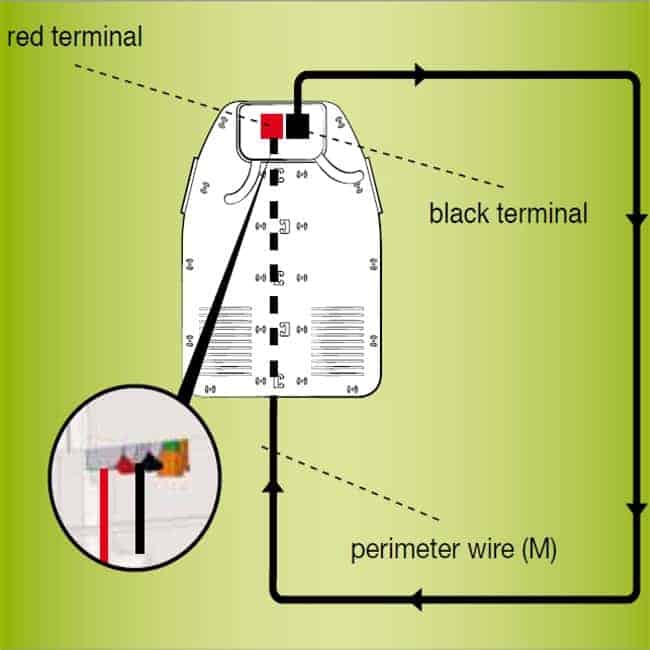
2.e) Final connection
The last part of your physical installation is to connect your perimeter wire to your charging station. Once your perimeter wire is fully installed the two ends next to the charging station can be run into their final position.
This final connection will be different from model to model. Most will require the wire that exits the charger in an anticlockwise direction to be run either underneath the charger or passed through holes or slots in the base of the charger before the wire is connected to the terminals in the charger.
The other wire coming from the clockwise direction will enter the back of the charge station and be connected to the other terminal.
Once all connections have been made ensure the power to the charge station is on and it’s time to test the installation.
3. Testing the installation
The first setup of robot mowers can again be different from model to model. Most will have either a Bluetooth or wi-fi connection so the setup can be completed by a free IOS or Android App. Follow your manual to set up these connections and complete the basis set requirement as per the manual.
Once you have the mower up and functioning, we recommend the following tests to check your installation:
- Firstly test the alignment and installation of the charge station. For this, we recommend to you place your mower on the perimeter wire facing the charging station about 5 meters away. Then send the mower home ten times to ensure with mower docks are correctly on each occasion. If it appears to be a misalignment or the mower just doesn’t dock correctly you will need to revisit how the charger has been installed, and double-check that it is installed completely flat and level.
- Also, check the perimeter wire is installed in the correct location under the charger and there is an adequate straight wire leading into the charger. This wire position can sometimes be adjusted to get the mower better aligned.
- Secondly, we recommend you run your robot mower around the entire perimeter wire at least 5 times to check that the mower can complete all turns reliably without leaving the wire or hitting obstacles on your boundaries. You can also use this test to see if the mower is cutting as close to the edge as possible. For any areas of the wire that can not be followed reliably, you can adjust the wire to correct any issues.
4. Programming your Zones & Schedule
Your robot is now ready to program your multi-zones if you require them. Zones are set up by either just entering a measured distance from the charger into the App and the mower will travel the programmed distance and then leave the wire and start to mow.
Others will require the mower to physically travel around the wire and you will set each zones wire location as the mower physically passes that location.
When scheduling your mower there is again a couple of methods for different models.
– Some will allow you to set start and finish times for each zone for each day of the week.
– Some will require you to tell the mower the percentage of the total area for each sub-area and then set start and finish times each day and the mower will mow each ear for the percentage of the total area set.
Most will only allow one start and finish time each day and some will allow two set times per day.

Most mowers will also allow you to set which days you would like the mower to perform an edge mow. This will send the mower for one complete loop of the perimeter wire to cut as close to the edge as it possibly can. Depending on whether your mower has a centred blade system or an offset blade system Will determine how close you can cut to the edge.
5. Conclusion
Yes, it is an effort to complete the installation. But keep in mind it is a one-off effort that will take between 2 and 10 hours that will save you many many hours of pushing your petrol-guzzling, pollution-contributing conventional mower.
The more time spent planning will pay off with less time spent on your installation.
For all of the above information, we have further tips and tricks that can minimise wire distances and allow the mowers to perform a little better than the manufactures recommended limits. So if you are questioning the ability of a mower to work on your lawns. Please contact us so we can provide solutions to suit.
Installation Equipment
-

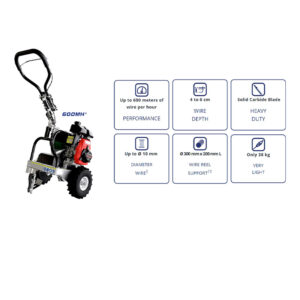
HIRE THE 600MH Cable Laying Machine (per day)
0 out of 5$120.00 (AUD$ Including GST)You can hire the cable laying machine for 24hs periods!
Pickup from our Brisbane store only.
In stock
-
600MH Cable Laying Machine
0 out of 5$3,799.00 (AUD$ Including GST)The 600MH can bury up to 600mts of wire per hour.
Stock Available from Manufacturer 3 - 7 days